Prepare yourself for the Microsoft MCSA 70-412 exam. This course explores how to implement an advanced DHCP solution, implement an advanced DNS solution, and deploy and manage IP Address Management.
These notes are my personal notes from the FREE training on Pluralsight. You can get your FREE signup through technet/MSDN or Dreamspark. The title of this course is exactly the title of this post. These notes are from this specific course only. I use these as a refresher Study Guide. POWERSHELL topics and cmdlets are in purple. I have a few notes with the “DEMO” each time the training included a DEMO just so you can see how many demos there were which were really helpful. Thanks to Greg Shields @ConcentratdGreg, the trainer, contact info at the end.
“Storage” – think more than just file server.
- Configure and Optimize Storage
- Configure Storage Spaces
- local disks
- create a Storage Pool
- all storage shows up (unused and available) in the PRIMORDIAL POOL
- new storage pool wizard
- during wizard can allocate “automatic” but can choose “manual” or “hot spare”
- leave it as automatic, can set RAID
- Then create a disk out of the storage pool. Then can create volumes on those disks as well.
- storage tiers checkbox is grayed out as tiering is not set up.
- can set simple/mirror/parity (RAID) in this wizard
- next button lets you choose thin or fixed provisioning.
- after creation, then create a volume on the new disk
- can enable data deduplication in next field (have to turn on the ROLE)
- general purpose or VDI de-dupe
- can choose exclusions, schedule, etc. Throughput optimization.
- Configure Tiered Storage
- Start with creating a new storage pool. Has the different type disks (SSD and spinning)
- (hack to create each with VMware workstation)
- Get-PhysicalDisk
- Get-PhysicalDisk | ft friendlyname,size,mediatype
- can set them in PS to be and appear as SSD or mechanical
- Set-PhysicalDisk -mediatype HDD
- So essentially you are setting them to have some SSD and some HDD so you can set up tiering.
- Now you have a different option in the wizard (Faster tier, Standard tier)
- the tiering is handled by the windows subsystem, no mgmt
- can set specific files to SSD by PS; Set-FileStorageTier
- (hack to create each with VMware workstation)
- Start with creating a new storage pool. Has the different type disks (SSD and spinning)
- Implement Thin Provisioning and TRIM
- we already talked about creating THIN
- tiered is THICK – cannot do THIN tiered
- see if THIN provisioning fits your needs
- TRIM – file delete notification. reclaim storage space. File Delete Notification is ON by default.
- disable file delete notification by registry setting if you want as it does add some overhead.
- PS Optimize-Volume
- Configure iSCSI Target and Initiator
- provides a method for any of the above disks accessible over network
- Target = where storage is, Initiator is who needs the storage,
- Configure; easier to create the initiator first (the remote network server)
- tools/start iSCSI initiator get alert box to start service each time
- iSCSI console
- quick connect option might not be the best for enterprise use
- you have to click the ADVANCED button to choose adapter and initiator IP (critical when using a separate storage network)
- at this point, we haven’t create the storage target on the fileserver yet
- new iSCSI virtual disk wizard
- create new iSCSI disk name, size, dynamically expanding, etc.
- next screen asks for target name, and the previously created one shows up. (which is why we created it first)
- can enable CHAP authentication
- “CONNECT”, then go to ADVANCED to verify IP, network, etc. If you don’t specify the right network, you could end up sending storage traffic over your production network.
- the remote server shows the disk just like it was a local disk, needing brought online, format, etc.
- PS commands for iSCSI
- Connect-IscsiTarget
- Disconnect-IscsiTarget
- Configure iSNS (Internet iStorage Name Service Server)
- used to simplify management of complex and large iSCSI setups (who is that?)
- registers initiators
- to register targets, you need PS command Set-WmiInstance -namespace root\wmi -Class WT_iSNSServer -Arguments @{ServerName=”actual server name”}
- after that, initiators and targets both show in iSNS console
- Manage Server Free Space using Features on Demand.
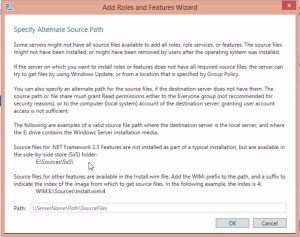
- basically allows you to remove unused roles to save space.
- this gives you the Specify Alternate Source Path window (screenshot)
- this is a good article to show where it searches.
- you can create a “feature file store” and put it on the network. it’s the SXS folder.
- Configure Storage Spaces
- Configure Advanced File Services
- Configure a NFS file datastore
- NFS more interested in computers not users
- “Server for NFS” ROLE (under file server)
- New NFS Sharing tab on share properties
- incoming client settings, permissions (which machines)
- by DEFAULT all machines have read access, and root access is disallowed.
- PS NfsShare, Get-NfsShare, etc.
- Configure file access auditing
- 50 new sub-categories, but same way to set up as previously
- Group Policy or local security policy
- 9 different original policies. Audit Object Access. Typically this is how we used to turn this on
- “Advanced Audit Policy Configuration”
- SACL; auditing view on file/folder properties, now you can also add CONDITIONS.
- Configure BranchCache
- transparent; cache documents in remote locations. I.E., branch offices. Bandwidth was historical a reason. Used to need Enterprise Windows versions, limiting it’s use. Now any version of Windows 8 works. Turn it on and don’t think about. File server, web server, or BITS data.
- First access of document initiates the copy to the branch.
- Distributed Mode (stores on desktop machine) or server based Hosted Mode.
- file is split into chucks that are hashed then only changed chunks are updated.
- One piece only does files, different piece does Web and BITS. These are in different places in FEATURES
- Turn it on via GPO, choose hash type, configure client side “turn on branch cache”, set hosted cache server name, set cache expiration, etc.
- You can pre-populate bia PS Publish-BCFileContent, Export-BCCachePackage
- Configure a NFS file datastore
- Implement Dynamic Access Control (DAC) DAC is supposedly heavily represented on 70-412 and 70-417 tests. Here is a great example and scenario about how to use DAC in a real-world situation, from the Microsoft Storage Team; http://mints4.rssing.com/chan-3739609/all_p2.html
- Addresses file permissions getting lost/changed during file moves. New security requirements also drive this advancement in security.
- needs to have characteristics set in AD
- Also settings on file servers.
- Scenario; you can filter all documents for SSN, and then disallow anyone from viewing such document unless the user is in certain group, site, etc.
- Can filter and scan files as they are updated (SSN added to file that did not previously have one)
- Think big IF THEN statement; IF this user is in FINANCE group, AND user is in DENVER, then allow read/write/etc.
- DAC scans documents regularly to keep up with changes.
- Configure User and Device Claim Types
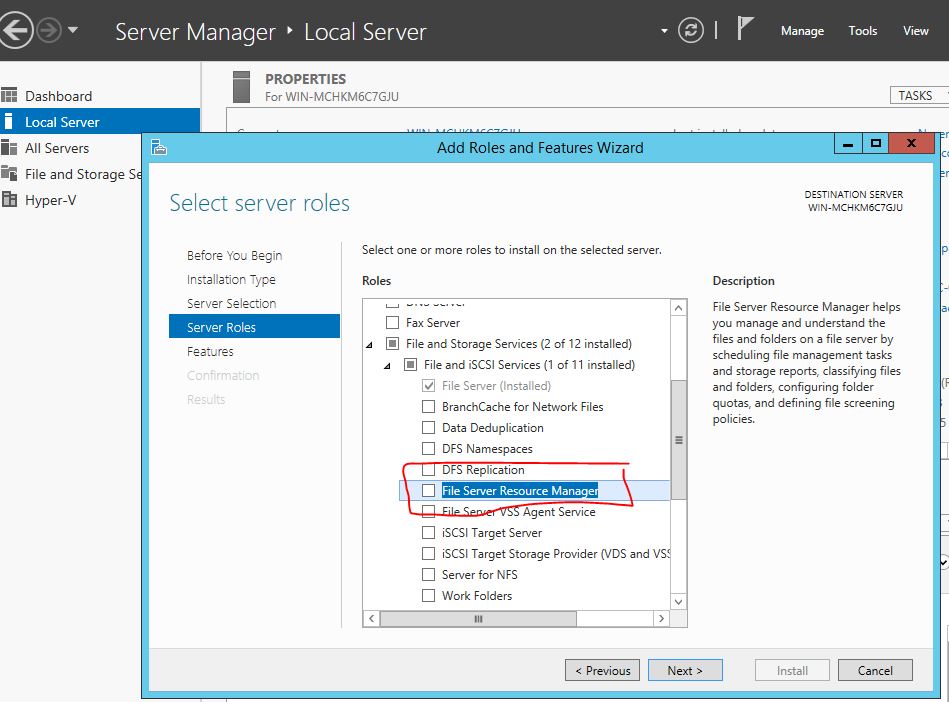
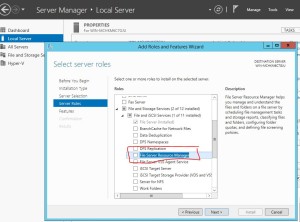
- Install File Server Resource Manager ROLE (screenshot)
- CLASSIFICATION tab in properties on your file server now.
- Active Directory Administrative Center (different from ADUC) has DAC
- Trying to get steps in order here;
- create claim types in ADAC for USERS
- Resource properties for files set up in ADAC / DAC console. Some examples built in are; Personal Use, Project, Intellectual Property, Immutable (?), Department, Compliancy, Personally Identifiable Information, etc. Then there are different values; NOT PII, Public, Low, Moderate, High, and you can create/edit values. These are set up then used later in AD to apply to files and folders
- Resource property lists ( add resource property to global) This is just a container of resource properties. Grouping these makes it more manageable to attach to documents. To use this, use PS Update-FSRMClassificationproperyDefinition, which enables the property list. Now it shows up on folder/share/file “Properties” as a new TAB. Users aren’t going to use this manually very much so you have to use server options; screen templates, file screens, classification management. This is the first step to determine what type of content you’re looking for in files / folders. You can scope to specific types of files; user files/ backup files, application files, etc. Scope this down to only the ones interested in, or you can get into resource issues. After picking scope, then choose the TYPE of classifier; for this a “content classifier” which looks at file content. Then you set the content classifier to “high, low, etc.” to apply that to hits that it finds. then you build the classification parameters which are detailed search expressions. you can look up the patterns on the internet or wherever like this one for SSNs. Now schedule to determine when and how often it searches. Check-box ” enable fixed schedule” then choose the times/dates/recurrence. You CAN force it to “run now” to see if it works. It allows logging and post scan reports. When if finds a HIT, then it actually will show as an updated “properties” tab on the file. You also can configure email request assistance and notification for remediation.
- Create new central access rule. This is in ADAC / DAC to set up how you want to apply the settings above to control access based on the detail above. Generally apply to “authenticated users” , they get access when certain defined conditions exist; user is in Kansas City, and belongs to HR, etc.
- Create central access policy is how the rule above gets applied to file servers. Then use Group Policy to deploy. New GPO for DAC policy. This would apply to File Servers. Then go back to properties on the share/folder and there is a “Central Policy” tab that you have to choose the policy.
- I guarantee this is a test question that MS uses. Keep in mind test questions are random so it might not be on EVERY test, but it’s on one I took.
- Install File Server Resource Manager ROLE (screenshot)
- Implement Policy Changes and Staging
- Create and Configure Resource Properties and Lists
- Configure File Classification
- Perform Access Denied Remediation
- Create and Configure Central Access Rules and Policies
- Addresses file permissions getting lost/changed during file moves. New security requirements also drive this advancement in security.